
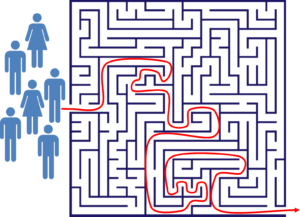
 In lean manufacturing – or in fact, in any kind of production system – you have to solve problems. Depending on the problem, you may need a creative solution and have to access the wisdom of the crowd. For this I have a workshop structure that I frequently use for problems that have lots of different options. Let me show you my workshop structure with which I’ve had quite good results.
Type of Problems
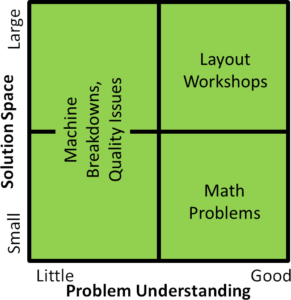 First of all, while the workshop structure below is good, it won’t be able to solve all problems. In my view, there are different kinds of problems, which can be grouped based on how well we understand the problem and how many possible solutions there are.
- Good Understanding, Few Solutions: This is for problems where the path is pretty clear and it just has to be done. An example is solving a mathematical equation.
- Good Understanding, Many Solutions: You have a reasonable understanding of the problem and can estimate the impact of your changes onto the system, but there are many different possible solutions that have to be explored.
- Little Understanding, Many Solutions: These are problems where you don’t even know what the problem is exactly. Examples are machine breakdowns or quality problems. You known the problem, but you don’t really know the root cause. In this case, you need to put the majority of your time into root-cause analysis.
- Little Understanding, Few Solutions: You don’t really know what is going on, although there are only a few solutions. Since you don’t understand the problem well, you don’t know the number of possible solutions. Hence this is overlapping with the “little understanding, many solutions.” It may be that the quality problem or machine breakdown has only one cause and you have to find it. You probably also would need to invest time into the understanding of the problem.
In any case, the following workshop structure is designed for problems where the group understands the problem reasonably well and can estimate how changes to the system influence the system, although there are still solutions hidden that they cannot (yet) imagine. Yet the many different possible solutions present a challenge.
A common example is a layout workshop to create a new layout for a production system. There are almost unlimited different ways for how to place the machines and materials on the shop floor. The workshop group knows at least somewhat how the placement affects the performance, but has trouble choosing one out of the many different ways to do it. This is where this workshop structure can help.
The Team
 As usual for such problem-solving workshops, the team should be cross-functional. It could include an engineer, a controller, or a programmer depending on the problem to be solved. It should definitely include at least one worker, and possibly more, who actually work with the system. It could also include one manager responsible for the area to ease the decision-making process. It should also, of course, include you as a moderator. Altogether there could be between five and ten people involved. Please note that since ten people are too many for a good working group, we will split it later into sub-teams of three to four people.
The Workshop Sequence
Introduction
 The introduction is common to many workshops. Introduce yourself. Have the people introduce themselves. Maybe collect the expectations of everybody on a pin board. Introduce the problem at hand. This could take thirty or so minutes. Often it can also be helpful to visit the actual location of the problem. In other words, for a layout workshop, visit the shop floor if possible. This could be another thirty minutes.
First Round of Solutions
 The key to solving these kind of problems where the approach is understood but the solution space is big is to generate many possible solutions in a short period of time (see also my post on Japanese Multidimensional Problem Solving). Hence we split up the group in sub-teams of three to four people and have them work out a solution approach independently. If possible, these teams should also cover different functions. Do not make a worker-only team and an engineering-only team, but mix them. Important: We don’t want to have a fully worked-out solution, but rather a rough concept. Do not fill in all the details yet; only generate a first workable idea. Give them around thirty minutes, which should be enough for a first idea.
Also, if possible, put the sub-teams in separate areas or even separate nearby rooms so they can work independently. Provide them with the necessary materials to work the problem, ideally based on paper. For example, for a layout workshop, give them a large printout of the shop floor map, plenty of paper in different colors, scissors, tape, glue, and so on. Let them work on the problem without giving much instruction on the problem-solving method. This first round usually serves more as a learning curve for the team and rarely generates the final solution. Another important point is that even though you as the moderator may be eager to step in and contribute, restrain yourself. Observe the teams, observe their ideas, and, most importantly, observe with which aspects of the problem they struggle.
After the thirty minutes are over, bring the teams back into the main room, have them present each other their solutions, and allow for some discussion. The entire group should list a few benefits and problems with each of these solution. This may take another fifteen to thirty minutes. Hang the solutions including their pro/cons on the wall, as they will be relevant later.
Second Round of Solutions
 For the second round, you as the moderator will introduce a challenge. Based on the problems these teams had before (as per the list of problems on each solution), restrict their design space to force them to work around the solution. This approach is called creative provocation, and I wrote a whole blog post on this, as it is my favorite creativity technique. For example, if a team has problems with getting workpiece carriers back to the starting point, force them to NOT use workpiece carriers. This restriction can be different for each team, as each team may have different problems with their solutions. Deciding this “restriction” is actually quite a bit of brain work for you, and hence I told you in the first round not to participate but to observe. This should give you plenty of time to think about a restriction.
The team may grumble a bit, but have them again separately do another solution within thirty minutes. This second round is not a refinement of the first solution, but instead a completely new solution. Optionally, you can shuffle the teams around a bit and move, for example, one team member in each group to another group. After thirty minutes get them together again and have them present to each other and list the pros and cons of the different ideas. Hang the results on the wall again.
If the problem needs more ideas and if you have the time, you can repeat this in a third round, with or without a creative provocation.
Last Round

In preparation for the last round, the team again looks at all previous solutions (which should be hanging on the wall), and as a group discusses the benefits and disadvantages of each solution. Steer the discussion toward a solution that includes all of the benefits but none of the disadvantages. Eventually ask the team if they want to generate another solution based on what they have learned. Almost always they say yes (if not, one solution is probably good enough already).
Hence they work out another solution. However, this time the team works as one group, creating only one solution. Also, do not give any restrictions on the solution space. If necessary, allow for more time, maybe up to sixty minutes. Afterward, there is no need to present, since everybody knows the solution already, but you still should list pros and cons.
For selecting the solution to be implemented, ask the team which one of these (now five to ten solutions) they like best and want to apply to the problem. Almost always, it is the solution from the last round. In some cases the team may indicate the desire for another round. In this case – time permitting – repeat the last round once more. But at the end you should have one solution with which the team is happy and which can then be finalized for implementation.
Wrap-Up
 The wrap-up also includes standard workshop methods. Give every member of the group the chance for feedback, and ask them if their expectations (the card from the introduction) has been satisfied. Maybe have them present the solution to the higher-ups. Definitely thank them for their support, and close the workshop (but still keep them updated on future events toward the implementation).
So there you have it. This is the basic structure for my workshops for problems that have many possible solutions. I have had quite some positive experiences with these in the past. Keys for success are many different solutions, some creative provocation, and a multifunctional team. Hopefully this will also help you to solve similar problems in your location. Now go out, gather your team, create solutions, and organize your industry!
Impressive improvement guide, example is apt prior to tackling a FMCC enterprise.
As a QC Facilitator I successfully used this approach in the 70 and 80s, known as “Quality Circles’ to improve productivity and save £Ms for Car Industry and supplier network