

One popular approach to battle waste is to streamline changeovers. Changing machines from one set-up to another is often a time-consuming exercise. Hence, in lean manufacturing, reducing changeover times is a well-known method for improving efficiency. In this post, we will go through the basic approach of improving changeover time, also known as quick changeover or single minute exchange of die (SMED).
This post is part of a series of posts on SMED, for the others see below:
Priorities!
Most commonly, a SMED workshop is broken into six steps, which will be explained below. However, as with any improvement project, the first question you should ask yourself is, “Is this my biggest problem right now?” As always, you should have an overview of the problems you are facing and have them prioritized. When you’ve decided which problem to address, then you should look for solutions. Only after finding problems, prioritizing them, and looking for possible solutions, should SMED pop up as one possible answer. Only then should you do a SMED workshop!
Unfortunately, I too often see examples where a SMED workshop is done only for the sake of SMED, wasting time and effort on improving something that is not really a focus area. Too often, middle managers instruct their subordinates to do SMED without knowing if this is really the best step to improve the company. If you find yourself in this situation, see if you can convince your superior to adjust his/her approach. If you can’t convince him – or if you know by experience that your boss is always right – then, for the sake of your career, go ahead and do a SMED.
In any case, regardless if you do a SMED because it is the right thing to do or merely because someone told you to do it, here are the six fundamental steps of SMED.
Preparation
Set up a Team
For a good changeover workshop, it is necessary to gave a good team together. This should be between three and five people, including an operator and/or a foreman doing the changeovers and an engineer or technician familiar with the machines and processes.
What to Measure
Before you start measuring, you should make sure that you get the entire process measured, not just part of it. The changeover itself starts after the last part produced at full speed and ends with the first part produced at full speed. It is easy to overlook, for example, times where the machine is running already but the operator still adjusts the settings and hence the machine is slower than planned. Additionally, there may be actions done before or after the changeover where, for example, a new tool is brought to the machine and the old tool is put back in storage afterward. These should also be observed.
Inform the Workers
Whenever you measure times on the shop floor, or even take video, you should inform the workers and their representatives and get their agreement. This makes things go much smoother. Even if you legally have the right to measure and take videos without the workers’ consent, it is almost certain that your measurements will be worthless. If the workers disagree with you measuring them, they can easily mess up your measurements by working extra slow. In many cases, you wouldn’t notice if they added additional steps to the procedure. Hence, get their agreement.
The Six Fundamental Steps of SMED
1: Measure Changeover Times
The SMED process starts with a detailed observation of the changeover process. The different steps of the process have to be identified for the entire changeover process, and its time has to be measured. Taking video helps, as this allows us to watch the steps again. The time of the video also allows easy measuring of durations. Please remember that whenever you take times or videos, make sure it is accepted by the workers and their representatives.
Also, you should observe more than one changeover since different people will do it differently at different times. Depending on the duration and the frequency of the changeovers, you may be able to watch a different number, but I recommend no less than three different changeovers. Afterward, you should have a list of steps including an average time to do the step. It is fine if you don’t have a fixed sequence yet, as different operators may do the changeover in a different sequence. We will fix that later. It is also possible that there are some steps done only by some operators. Keep them in the list; we will fix that later too. Below is an example for illustration, where a total of ten steps have been observed.

Please note that these observations cannot be delegated, as this observation also gives you and the team a crucial understanding of the process necessary for the next steps.
2: Identify Internal and External Elements
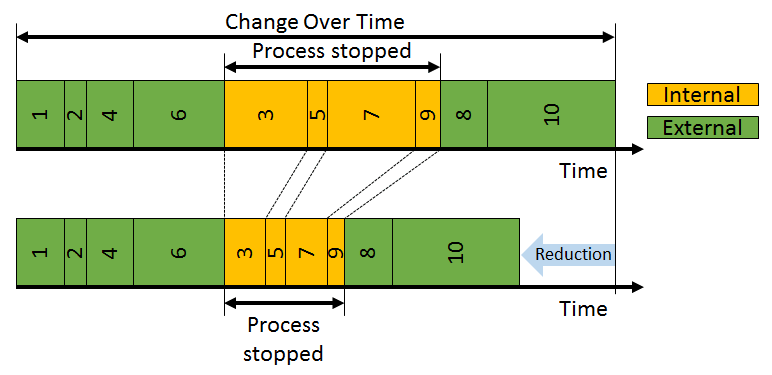
Next, we check which of these changeover steps have to be done while the machine is stopped and which can be done while the machine is still running. These are usually called External Steps with a running machine and Internal Steps with a stopped machine. Below is a graphic representation, where green indicates external and gold indicates internal steps.

3: Move As Many Elements as possible to External
Next we move as many steps as possible to external. This means not only converting internal steps to external, but also ensuring that an external step is indeed done before or after the process interruption. This sounds banal, but you would be surprised how often a changeover happens where the process is stopped and then the workers go get the tools and parts for the changeover. This can be done before the machine is stopped. Similarly, returning the tools to storage can be done after the machine is running again.
Below is a visual representation of this process. You can see that the time of the stop is already reduced. Hence, you can get more parts out of your process since the stop is shorter.

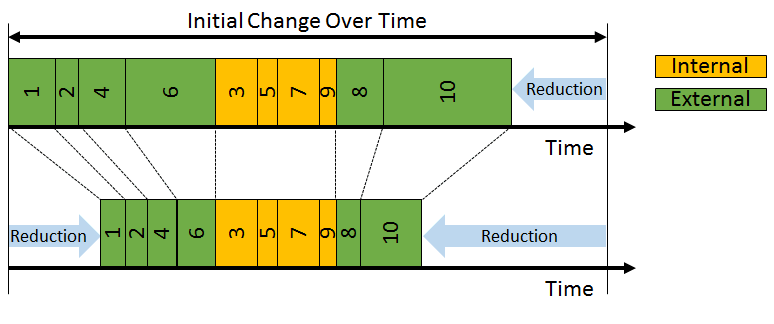
4: Shorten Internal Elements
After moving the external steps to external, we now shorten the internal steps. Check if the procedure can be simplified. Check if there are better tools available. Eventually, the new setup may look like the image below, where both the time of the stop and the overall changeover time may be reduced.
5: Shorten External Elements
Next we do the same for the external elements. Check if we can shorten the external elements. This will not reduce the stoppage of the process, but it will reduce the overall time of the changeover and hence the workload for your workers doing the changeover.
6: Standardize and Maintain New Procedure
The last step is the most difficult one and the most frequently forgotten one. It is not enough to do a changeover quickly once; you have to do it quickly every time. So you need to fix the new standard, document it, train all relevant workers in the new standard, and do a process confirmation. Any standard not maintained that way will be soon lost.
For example, you could check every now and then if the standard is still followed. You could have the workers write down the time needed for the changeover and see if it starts to slip. Maintaining a standard is actually not that difficult, but it needs something short in supply in most companies: Management Time and Attention!
Practical Tips
Before closing this post, here are a few practical tips. The above six steps are sometimes found in slightly different versions in different sources. This is okay. You also don’t need to follow this framework in that order, as long as the beginning and the end of the framework are at the beginning and the end (measure the times first, standardize the new procedure last). For example, if during the shortening of the internal elements (#4), you find a way to make this step into an external step, by all means do so and then move the step to external (#2).
Some SMED frameworks have an additional point: Repeat the process again. I disagree. First decide what your biggest problem is now, and if during the identification, prioritization, and solution seeking of the problem you come back to SMED for this process, then do it. Otherwise just repeating it is pointless. Of course, there is more potential that can be found in a second round and this would be nice to do. But as long as your time is limited, you can’t do everything that is nice; you need to focus on what is necessary!
Potential
These SMED workshops are often quite powerful. If there has never been a changeover workshop for a particular process, then you probably can reduce the changeover time by 50% to 70%. If there has been a previous changeover workshop within the last two years, you can probably reduce it by at least another 30%.
As for the changes, these are often not very expensive. Organizational changes are usually without investment. One SMED workshop I did had as its most popular measure a new plastic shovel for handling granular material, and we got that shovel for free from the supplier of the material. Another workshop found out that the worker had to go from the third floor to the basement every time a valve needed to be turned on or off. Replacing the manual valve with a remote-controlled electric valve effectively gave the plant four weeks of additional production time per year, at a cost of less than $500.
Also, if you manage to reduce changeover time, you should seriously consider not producing more with the available capacity, but performing changeovers more often and getting smaller lot sizes. This way you can usually multiply the effect of the available time by reducing materials. In sum, SMED can be a very powerful tool to improve your processes. I hope this post was helpful for you. Now go out and improve your industry!
If you like this post, you may want to read my other posts on SMED:
My dear friend, thanks a lot for the information!
This very important for planning as well. Need to find how to use in product development.
Excelente la forma tan clara como se da la información.
information is very clear and helpful. thanks!