
 In my last post I talked about the different steps on how to do standard work. In this post I will go into more detail on how to write the actual work standard that is put up at the workplace. This will include quite a few examples in different styles, before I will go into a bit more detail for one example in my next post.
Introduction and Purpose
A work standard should describe the work understandably in the necessary detail. Understandably means to use plain language, and can be enhanced with pictures, diagrams, checklists, and so on. But what is a necessary detail? It is NOT a replacement for instructing the worker on how to do the job. Hence you don’t need to state the obvious. If an assembly station has a powered drill hanging over the table, you do not need to include in the standard where the drill is found. The detail of the standard depends on the two functions of a work standard:
- To make sure the worker doesn’t make a mistake or forget a step.
- To allow managers to verify the correct use of the standard.

Important: A standard is not a substitute for proper training, both on-the-job and theoretical. The standard can be used by the trainer to help with the training, but do not simply give the worker the standard and tell him to do it. This will not be good for quality, performance, and safety. Let’s have a look at what goes into a standard before I show you a couple of examples.
What Goes into a Work Standard

A work standard has a few common elements that are found in pretty much every work standard. The basis of a work standard is a list of steps. These could even be simple bullet points or a checklist, but some sort of tabular arrangement is more common. Each step of the work is explained in not too little but also not too much details. Remember, it is not a exhaustive instruction but more of a checklist for workers or managers. They can go into more detail where mistakes can be made, but glossing over details that are obvious to the worker and also obvious or irrelevant to the manager observing the work. The level of detail also depends on the frequency of the task. A task repeated every 60 seconds for the entire shift may have great detail and describing steps of only a few seconds, sometimes even splitting a right-hand and left-hand action. A task taking days and repeated once per week will have much less detail and may summarize an entry covering multiple minutes or even hours into one instruction. The latter requires higher skilled workers with more experience.
Sometimes these steps are also grouped in sub-steps or even sub-sub steps, but try not to overdo it. Often, relevant key points for safety or quality are highlighted or may even have a separate column in a table. These steps are often numbered. Sometimes they also include the duration of the step, although many standards omit these. Just because you have the time does not mean that you should include them in the standard. Judge if it is helpful for either the worker or the manager before including it.

Most modern standards have not only text, but also include photos, diagrams, or other illustrations. These can help to make the standard easier to use and understand. But again judge if it is really necessary to include a picture of everything. It may be obvious to the operator, and the observing manager may also figure it out by himself if he observes the operator. Only if it has real value for either of them should the image be included.
Things to Consider

Like all standards, you should test the standard and iterate a few times until you have a good workable standard. Plan-Do-Check-Act (PDCA) is quite relevant here too. Also try to make the standard short. The standard should fit on one page if possible, so it can be displayed at the workstation. If the manager or the operator need to flip pages, then they will never look at the second page. It is a bit of an art to decide what to leave out to make it fit, but please do put in some effort even though adding stuff feels more natural to us than removing stuff.
Example Standards
Here are a few example standards. Due to copyright reasons I am limited at what I can show you here, but I hope they do inspire you.
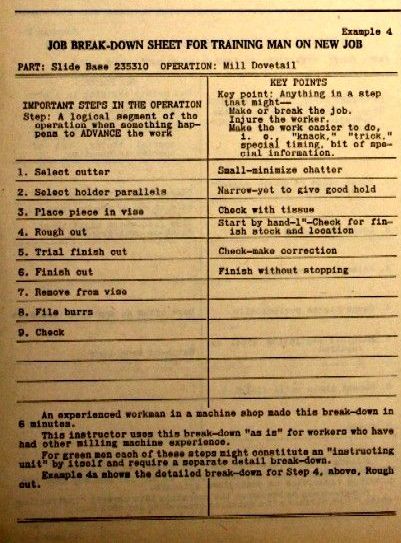
The first is an standard from an older Training within Industry manual, and out of copyright. It is only text (no graphic editing computer in 1945, sorry), but they do highlight key points of the milling of a dovetail.
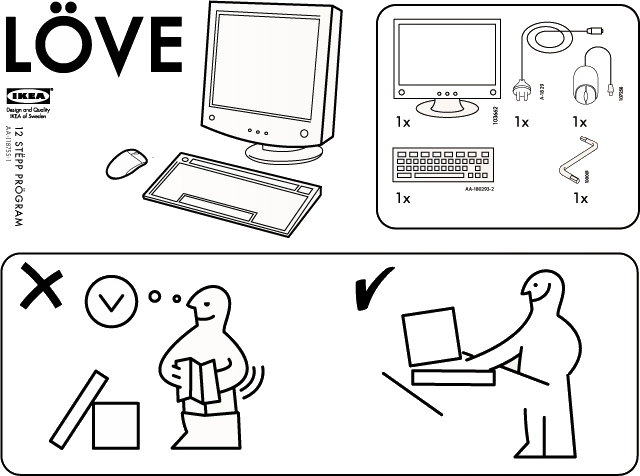
The second example is completely without text, since the “operators” do not speak a common language. It is an Ikea-style standard with pictures only. For copyright reasons I cannot show an real Ikea standard, but this crop of a “Löve” parody by Ola Einang should give you an idea. Different from “normal” standards, there is also no proper on-the-job training on how to assembly Ikea shelves. Maybe that’s why I sometimes put a piece in the wrong way? However, it is a lot of effort to get a good picture-only standard, and text is commonly used in industry. Nevertheless, I have heard of cartoon-style standards in some plants where the workforce is illiterate due to a dysfunctional education system.
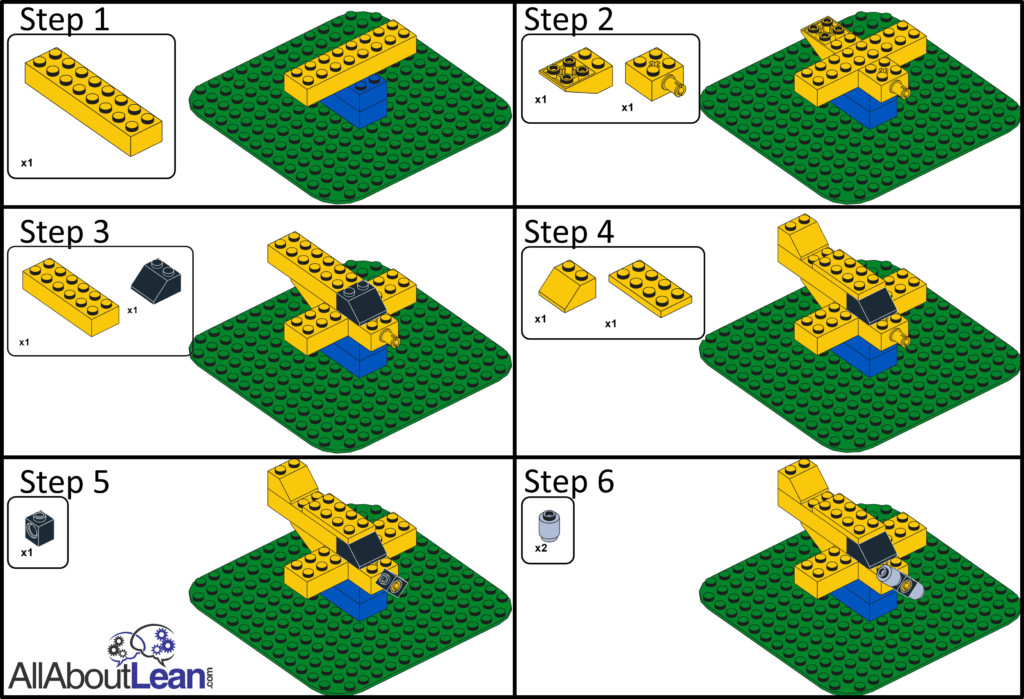
Another image-only standard is for operators who have not yet started their education. Lego is for age 4 and up, and hence also only in pictures. The images below are for a small model I made using the free LDCad, with the subsequent instructions created using the also free Web Lic. Both are specialized for Lego. I later also twiddled a bit with the images in PowerPoint.
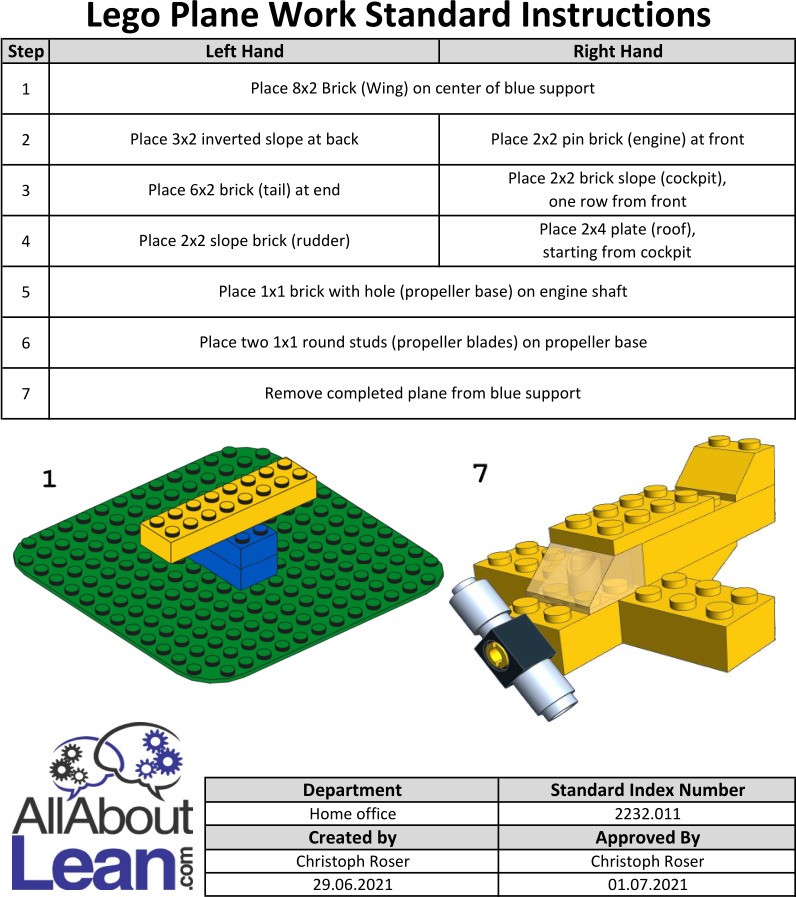
Now for a more industrial-looking standard that distinguishes between the left-hand and right-hand action. The example is also the Lego plane from above. Such a “left-hand-right-hand” standard is useful for assembly with short cycle times, and is used for example at Bosch. This one can go into great details to optimize the work for efficiency. This example also includes images, but much less than the Lego standard above.
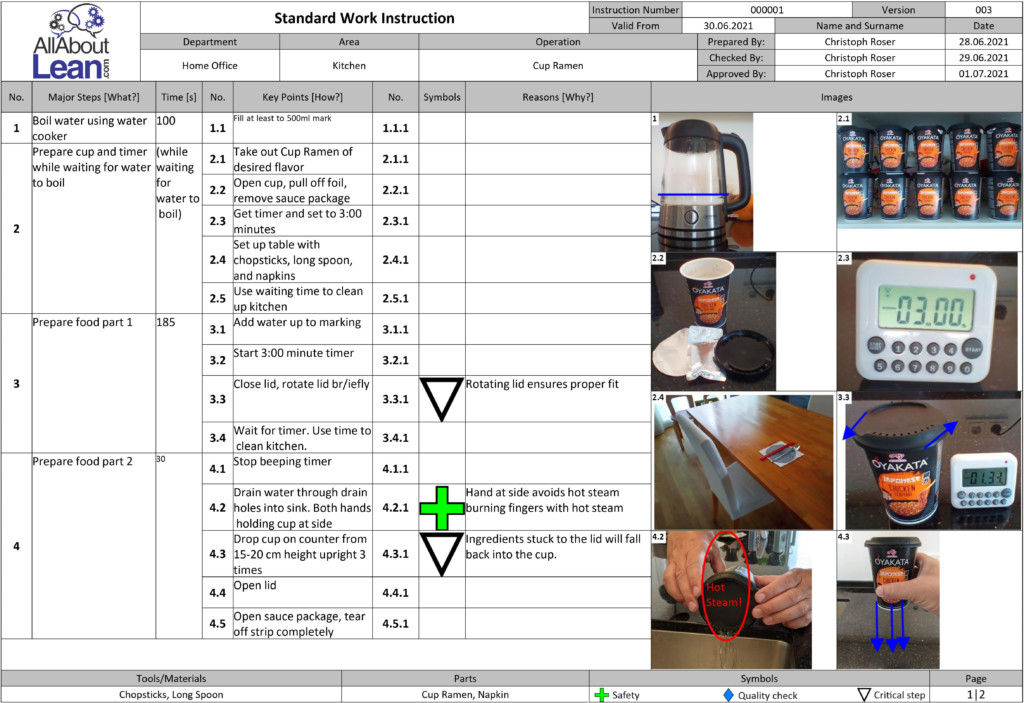
Here is another industrial standard, although I made this myself with the help of an software tool Soft4Lean SWI as an example for a standard to cook a cup of ramen. More on the standard and the Soft4Lean tool in my next post. This standard includes a column for times, and has a hierarchy of subheadings (“Key Points”) and sub-sub headings (“Reasons”). It also has a columns with symbols to highlight certain (sub-)steps. It also has plenty of images. The entire standard is two pages long, and hence a bit too long for my taste.
 Here is the cup of ramen standard again, but this time with a slightly different format. Now there is only one hierarchy level. I also eliminated some of the images and twiddled a bit with the steps, so that the entire standard fits onto one page. This makes it much easier to display.

Hopefully this article will give you some ideas and inspiration on how to write a good work standard. In my next post I will go into more detail on how to make the cup of ramen standard. Until then, stay tuned, and go out and organize your industry!
Series Overview
- Standards Part 1: What Are Standards?
- Standards Part 2: Why and Where to Do Standards
- Standards Part 3: How to Write a Standard
- Standards Part 4: How to Write a Standard (Continued)
- Standards Part 5: How to Use and Improve a Standard
- Standards Part 6: Standardized Work
- Standards Part 7: How to Write a Work Standard
- Standards Part 8: Example for a Work Standard
- Standards Part 9: Leader Standard Work
Professor,
I found the examples provided very helpful in my understanding of the proper format of a work standard. There is a wide variety of age and format which is also helpful. It is also great to connect this tool in the toolbox to others, like PDCA. It’s a great example of why we need to use things in tandem and to understand fully the theories we are using to organize our industries.
Thanks.