
 In my last post I talked about what you need for Cardboard Engineering. In this post I will show you how to do a Cardboard Engineering workshop. Spoiler: Keep in mind that the goal is not to just put something together but to try out different options (and I will repeat this a few times in this post). It is very easy to have fun with cardboard while learning very little about the problem you want to investigate!
The Goal of the Workshop
Before you start, you should be clear on what you want to achieve in the workshop. As per my last post, the two most common goals are 1) to create a layout for a production system on an already existing shop floor; and 2) to optimize a single workstation for ergonomics, layout, and material flow. Make sure you know which one you want. If you want both the big picture layout and the detailed set up of every workstation, you are biting off more than you can chew! While you may be able to set something up both big and small, keep in mind: The goal is not to just put something together but to try out different options!
Also understand the scope of your workshop. What are the boundaries of the material and information flow you want to analyze. The better you define your problem, the better will be your solution.
Team
 As usual, the team should be cross-functional. As this is a very hands-on workshop, you should include more than just one operator from the line or workstation (or a similar line or workstation if you are creating a new one). You also need a moderator, which may also be the manager. It also helps to include an engineer who will later turn our cardboard models into reality. Ask if a member of the unions wants to participate. For layout optimization it may also help to have someone familiar with the infrastructure and the requirements on emergency exits and the minimum width of paths and roads and other stuff. Altogether there could be between four and six people involved. While I often split larger groups into sub-teams, it may not work well, especially if you want to set up the layout.
Duration
 How long should you plan for the workshop? It depends. Usually it is difficult to do it properly in less than one day. Sure, you can put something together in half a day, but again the goal is not to just put something together but to try out different options! Such workshops can last between one day and a whole week, depending on the complexity of the problem. I will talk a bit more about this farther down at the Agenda.
Final Preparations
Besides organizing all the tools for the workshop (cardboard, cardboard cutters, glue gun, … see my last post), you also will have to make sure you have proper space for the cardboard designs. If it is a layout optimization of a new line, it would be best to do it right on the shop floor – which of course requires this space to be free. If the shop floor is not available for a cardboard layout, it may be very difficult to do it somewhere else. The idea of the cardboard model for the layout is to see how it fits on the shop floor, and hence makes only sense if it is done on the shop floor. If you have no access, you may be better off doing it on a paper layout or a computer.
If you optimize only one workstation, it may be useful to do it right on the shop floor. However, this is often not possible (e.g., since the line is running or the space is occupied). In this case feel free to use any kind of meeting room that is big enough. It may help to have a few samples of the product components and the completed product to see if the model fits the product.
Agenda

Now lets have a look at the workshop itself. Below are the different agenda points. This is loosely based on My Workshop Structure for Creative Problem Solving.
Introduction
Welcome, warm-up, introduction of problem, introduction of people … if you have done improvements workshops before, you know the drill.
Creating Ideas and Narrowing Down the Solution Space
 Even though it is tempting, you should not start with the cardboard construction right away. If you would do so, you will get a cardboard gadget, but it will be far from an improved solution. Hence, before touching the cardboard, you should first narrow down the solution space to a few feasible solutions. This is almost like a mini-workshop, and this would be the workshop you would be doing if you would not use cardboard engineering. Again, the goal is to come up with an useful solution that you think is superior to the other concepts and ideas you had. This can take around half a day, although it could be less for simple problems, or more for complex ones.
Building Cardboard Models (More Than Once)
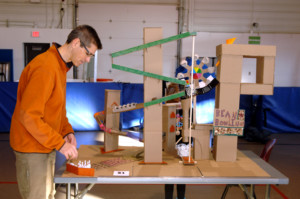 Finally, you get to build the cardboard. Have the team create a cardboard model. This is usually quite fun, and can also be an excellent team-building exercise. This is also usually not challenging for the moderator, as the team pretty much runs by itself.
However, this is no time to idle. The moderator needs to think about all the possible problems, shortcomings, and flaws of the model. You may have to force yourself, but rip the model apart mentally – because the team may have to do just that later on in reality. After all, the goal is not to just put something together but to try out different options, and the current solution can always be improved.
So, after the model is built, have your team look for flaws and things that are less than optimal. I do not mean the quality of the model – it is temporary anyway – but for things that are not perfect or that can be done better. This may be difficult for the team, since the cardboard model is now their baby, but we are looking for a prettier baby now! If it is the optimization of a work station, have a worker mock-assemble a product a few times to see what is good what not.
 After this discussion, the new ideas are put into cardboard. Do not hesitate to build a completely new model. Especially for workstation optimization it is not a problem to build a second model next to the first one. For smaller changes you may also simply fiddle with the existing model. For a layout optimization you may have to rip out entire cardboard machines and build them again. If you change or destroy a model, don’t forget to document it before you change it!
As before, while the team is building, think about all the sub-optimalities of the second model. While it is (hopefully) improved, it still can be done better. We are still looking for a prettier baby. Unless you are running out of time, you can now discuss this with the team, and build a third model, similar to the process leading to the second model. Sometimes one model is good enough, but usually two or three models give better solution. Rarely do you need more than four models. Because, again, the goal is not to just put something together but to try out different options!
As for the time required, I estimate how long it takes to make one cardboard model and multiply by three. Granted, the second and third model will probably go a lot faster, but you also want to have discussion time in between to consider new ideas.
Wrap-Up
Now you have multiple models. Pick the one you and your team consider to be the best. If you have more final ideas, feel free to create a final tweak of the model. Sometimes this may also be a zombie consisting of part of one model and another part from another model. Whatever works best is the way forward. You also need probably at least one hour to document the model and to transfer the information to the people who do the real construction, possibly quite a bit more.
Summary
So this is the approach to use cardboard engineering in lean. Did I mention that the goal is not to just put something together but to try out different options? This is probably the most common pitfall of cardboard models, where the joy of having a nice model is valued more than having the best possible solution. We don’t care about the model; it is going to be ripped apart and trashed soon anyway. The solution, however, will stay with us after it is implemented. Hence, the goal is not to just put something together but to try out different options!
In my next post I will show you a few alternatives and variants with different materials, from ultra-low-cost to fancy, shiny stuff. Until then, go out, try out different solutions, and organize your industry!
I conducted an introductory Workshop with a brake cable manufacturer around 1990. They almost had a nicely-balanced, effective and efficient line ….but for one station, which was way over tact. The operator used to start early to build up stock!!
The team created a beautiful ergonomic ‘cardboard work station’, at the heart of which was a tri-wall container. It was only supposed to last a couple of weeks until they could create something more solid, but actually lasted 6 months …which was a cause for both joy and disappointment.