
 In this post I will discuss the layout of the milk run as well as the space on the milk-run train, and other topics. It is a continuation of the previous post on the milk-run calculation. Let’s continue.
Space on the Train
 After calculating the required inventory that has to cycle around in the milk run, we next need to consider the space needed on the train. For each part you have to bring full boxes and return empty boxes. However, you have to consider only one or the other. If you are bringing full boxes of a part, you won’t have empty boxes for this part yet, since you pick them up only after delivery of the full boxes. If you are returning empty boxes, you have already dropped off the full boxes. Hence, you need to consider only the empty or the full boxes. I would recommend the full boxes, since empty boxes are easier to handle and may stack inside each other. In any case, the number is pretty much the same.
So how much material does the milk run have to carry on its route in the worst case? This is simple to answer: it is one cycle’s worth of material consumption. Hence, the milk run has to have enough space for one cycle’s worth of boxes of all the materials that are delivered, plus some safety buffer to account for fluctuations in the consumption rate at the assembly location.

Hence, similar to the calculations in the previous post, the calculation of the total number of boxes of one part on the milk run is as follows:
\[{ No. \: of \: Boxes = \frac{(Milk \: Run \: Cycle \: Time)}{Consumption \: Takt \cdot Pieces \: per \: Box} } \]Again, you may end up with a non-integer number of boxes (e.g., 4.2 boxes of part A). In the previous equation, we rounded it up since the line absolutely needs this part. Here, the milk run only needs to have enough space for the box. If one material type has one box more, another material type may have one less. Hence, I would not strictly round these numbers up all the time. If I have 3.1 boxes, I would go with 3; if I get 3.5 boxes, I would go with 4. It all depends on how much risk you are willing to take, but here it is not quite as critical.
Milk-Run Loop Layout
Milk-Run Stops
So far the design of the milk run was a pretty much straightforward calculation. Now comes the more artistic part. How do you design the loops for the milk run? First, you need to figure out where you want to have your stops. You definitely need one at the warehouse were you get the material. Ideally the warehouse can handle multiple milk runs simultaneously if you have different routes.
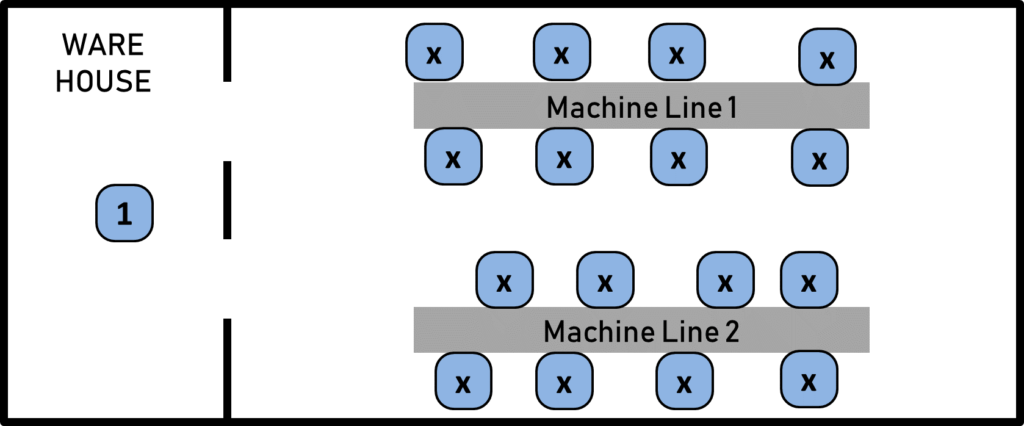
For the assembly lines or cells, you would have to consider where you want your stops. You best take a A3 print of the layout and go through the shop floor, thinking about where you need material. This can also depend on other logistic elements. For example, if you have a point-of-use provider (also known as water spider or, in Japanese, misuzumashi) that brings material from a small supermarket near the line to the actual machines and assembly locations, you may need only one stop with a supermarket for one line. If, however, the milk run is the last logistic step before the part is assembled, then you need probably multiple stops along the cell or line.
At the end you should have a list of stops where the milk run is supposed to deliver material. It also helps to determine which material has to be delivered at which spot.
Milk Run Route
Next, you have to determine the route of your milk run. This is done by connecting the desired stops in a logical fashion.

There are two things that limit your milk-run length: the time needed to do the milk run has to be less than the milk-run cycle time we used for our calculations above, and all the material has to fit onto the train.
 As for the time, you should put as much logistics in the cycle as you can. If your milk run takes one hour, then try to put almost one hour’s worth of work in it. However, do keep some safety time buffer too. If your milk run falls behind, your whole assembly line may be slowed down. The calculations below assume a human driver, but similar calculations can be done for automated guided vehicles too.
There are a couple of things that go into the calculation of the loop. You have the time needed to drive the distance. Depending on your vehicle and regulations, this speed may be somewhere between one and two meters per second, not including acceleration and deceleration.
You also need time at a stop to load material and pick up empty boxes. This is best simply tested, and may end up with a few seconds per box handled, plus possible walking distance for the operator.
You also need time to restock the milk run in the warehouse. How many empty boxes have to be refilled? This may take more time than the drop-off at the assembly line, especially if you need time for additional repacking or kitting work.
Often, the time is the bigger constraint, but occasionally check if your stuff still fits on the train. Most trains have from three to five wagons, but this depends on your type of vehicle. Overall the train should be able to safely and easily navigate your shop floor.
I find it best to simply start at the warehouse, and add stops (including the driving time, time at each stop, and time to refill at the warehouse at each stop). I follow a logical sequence of stops along the line. Whenever I reach my time (or space on the train) limit, I finish one loop and start the next. Do not forget the return trip, hence loops are better than in-and-out trips. Also, try not to have all milk runs depart from the warehouse at the same time, or you will create a rush hour that slows things down.
Iterations
 Chances are that while doing the calculations, you may run into a constraint. You run out of space at the line (common), your train will be too long, etc. If so, you may want to adjust the above assumption of the milk-run cycle time and redo the calculations. Excel is a great help here. Over time you (hopefully) will get a workable solution. You may also choose to deliver the bulkiest parts by forklift rather than milk run, although this is not really a good lean style. Overall, multiple smaller milk runs are often better, with lower inventory, and more flexible than one big run.
To be honest, this iterative process can result in a lot of fiddling. The goal here is not to achieve the best possible solution, especially if this is your first milk run, but something that works reasonably well. When the actual milk run starts, you will in all likelihood find many things that you overlooked or that behave different than expected. It is easier to improve a running system (more below); you just have to find a system than does not crash your shop floor.
At the end you may have created a number of different milk runs that all should be comfortably below the cycle time and should able to fit all the material needed for one cycle.
Refinement
 You gave it your best effort, did the calculations diligently, carefully checked all numbers, and then set up the milk runs. Nevertheless, chances are some things may not work out as well in reality as in theory. That is life. By nature of the calculations, you made assumptions, some of which may turn out to be not good enough.
When creating a new milk run, definitely keep a close eye on it for the next few days or weeks, and consult with the drivers and assembly-line workers about their problems. Follow up these problems and refine the milk run as needed. You may have additional stops, increase delivery frequency, use smaller boxes, or do other things to tweak the performance. Such projects (like most lean projects) are not fire-and-forget projects, but something that needs work and care, especially if they are new or if the system (products, machines) change.
So, this is the gist of milk runs. However, there is much more. In the next post I will discuss a few frequently asked questions on milk runs, and then also discuss external milk runs. Now, go out, get your material flowing (cyclically), and organize your industry!