
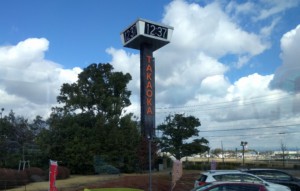
 Flexible assembly lines are well known at Toyota – except that there are two types of “flexible assembly lines.” The well-known one is making multiple different models on the same line. But Toyota has developed a new type of flexible assembly line, where the entire layout of the assembly line can be changed quickly and easily. Confusingly, this is also called a flexible assembly line, although Toyota itself does not even have a name for it (different from the West, Toyota focuses more on doing something, while the West often puts the most effort into a catchy name). Their pilot line is in the Takaoka plant. Let me show you.
Line Layout
Should You Split Your Production System into Two?
 In a recent discussion on setting up a new line, a question came up: Should we make a single line (or generally a production system), or should we establish two (or even more) separate independent production lines? There are usually a handful of arguments for either side, and cost is only one of them. Sometimes the issue is clear, but sometimes you have to judge the different factors to decide. This post will give you an overview of the different factors that are relevant. Let’s dig a little bit deeper on how to approach this issue.

Line Layout Strategies – Part 2: I-, U-, S-, and L-Lines
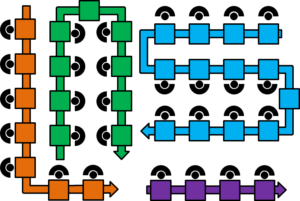 The layout of a line can make quite a difference in the performance of your line. The U-line is most famous, although in my view while good it may not be the right thing for all situations. There is also the I-line, the S-line, and the U-line. In my last post I described some general thoughts on line design and took a look at the big picture. In this post I want to look at and compare actual line layouts, in particularly the I, U, S, and L layout. Let me give you an overview of the different options.
Line Layout Strategies – Part 1: The Big Picture
 In flow shops, you have a production line of some sort. This may be an assembly line or a manufacturing line; this may be automatic or manual. In lean, you often hear about the famous U-line.
While this is a great solution, it may not fit all problems. Depending on the surrounding conditions, a different line layout may be beneficial. This post is the first in a series on line layout. In this post I would like to discuss what you should consider when designing a new line layout. The next post will look at actual line layout options.