
 In this rather long series of posts on Mixed Model Sequencing to handle product-dependent workload, we are finally getting to the most complex part: Sequencing of products when multiple stations have product-dependent workloads. Read on:
How To Address Multiple Workload Imbalances
In the following I will describe an approach on how to create a sequence with the goal to reduce the idle time of your workers while keeping the buffer inventories small. This is all with production where the workload depends on the type of product.
But first a small warning: There is probably not a perfect solution. We hope to find a solution that is not too bad. This is a somewhat messy process, and you will quite likely have to do quite a few iterations until you are satisfied (or running out of time).
Also, one of the requirements for this to work is a lot size one. If your system can work only in larger batches, then it is usually not possible to have a batch with a lot of work at one station to be canceled out by another batch with little work at this station. If you have a lot of four-door vehicles, excess work will accumulate. While this overload may be reduced by a corresponding underload (e.g., a two-door vehicle), you would need a large batch before the workstation to achieve this. This large batch could cause more waste than the over/underload.

If you are worried about this being difficult, don’t worry, you will get lots of practice by redoing the sequence every few weeks due to a change in customer demand, new machines, new products, and so on. In a year you will be good at this!
Determine Customer Takt, Line Takt, Cycle Time
 Before even thinking about the sequence, we would need to know the customer takt. What is the average time between one customer’s demands? This customer takt defines the overall requirement on your production line. For more on customer takt, including how to calculate it, see my post How to determine Takt Times.
Based on the customer takt, you get the line takt (which is pretty much the same thing, ideally). The line takt multiplied with the OEE (or, at this point an estimate of the OEE) gives the target cycle time. I have described the whole process in my series on Line Balancing.
At the end, you need to know how fast your production line has to be on average, either as a line takt (including losses) or as a target cycle time (excluding losses).
Get All the Work Contents
 Now we need to get the details on the work content of the different products. This will be time consuming.
You would need to look at all the different tasks that need to be done for each product variant, and how long they take. If product A gets something attached with 4 screws, how long will it take? If product B has only three screws, how long will this take?
If you have no line yet to look at, a system of predetermined times like MTM may help you to get an estimate of the durations. If you do have a line, you may consider measuring it directly at the line – but make sure that the people and the union are informed about this. Depending on the legal situation, they do have veto rights on this in some countries.
If you measure by hand, also keep an eye out for tasks where the workload fluctuates a lot. This is an indication for a bad standard or insufficient training. Getting these fluctuating durations for the same task at the same part under control will help you later on.
Also keep an eye out if the stations have to do rework. This would also have to be included in the data collection. It also helps if you list the tasks in the sequence that they have to be done. While this sequence is not final, it makes things easier later on compared to a randomly ordered list of tasks.
Luckily, a lot of the tasks and their durations are usually identical. But there will be enough tasks left that are different, and these will make life tricky for you.
Below is a (fictional) example of installing car seats. Some steps are the same across all models. In the example below step 4, plugging in the sensor takes the same duration across all product types. Other steps are complementary, as for example steps 1 and 2. You attach a seat either with 4 screws or with 6 screws, but you do either one or the other. You do not attach two driver seats, nor do you attach zero driver seats. Similarly, you add only one floor mat, although the durations may depend on the model as seen in steps 7, 8, and 9.
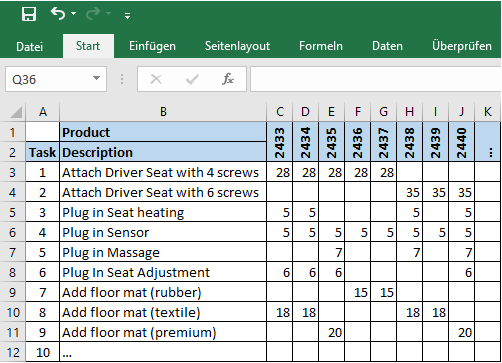
Other tasks are independent of each other. The seat may have seat heating, electric seat adjustments, and even a massage function – and there may be any combination that depends only on the product type. You could have all of them (as with product type 2440), or none (as with product type 2436, 2437, and 2439).
Overall, getting this data will take time. Some of the data may not even be available, or will be subject to a lot of guesswork.
Reduce or Eliminate Overloads, Spreads, and Fluctuations When Possible
Now would be a good time to see if you can eliminate some of these fluctuations. Can you make tools that make the tasks more similar? Can you change the training, improve the standards? In the example from above, the floor mat installation has been standardized and now takes only 15 seconds regardless of the type of the mat (and the type of the vehicle). The more differences you can get away, the easier it will be later on.
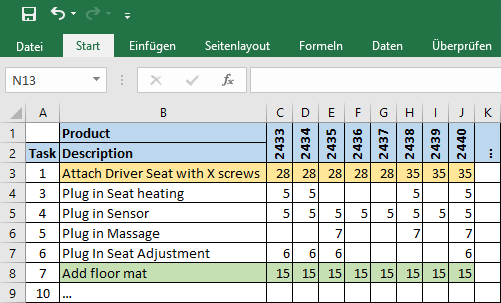
It may also be a good time to condense complementary tasks into one line. In the example above I merged the seat attachment into one line. The times are still different with 4 and 6 screws, but having only one line makes it slightly easier later on.
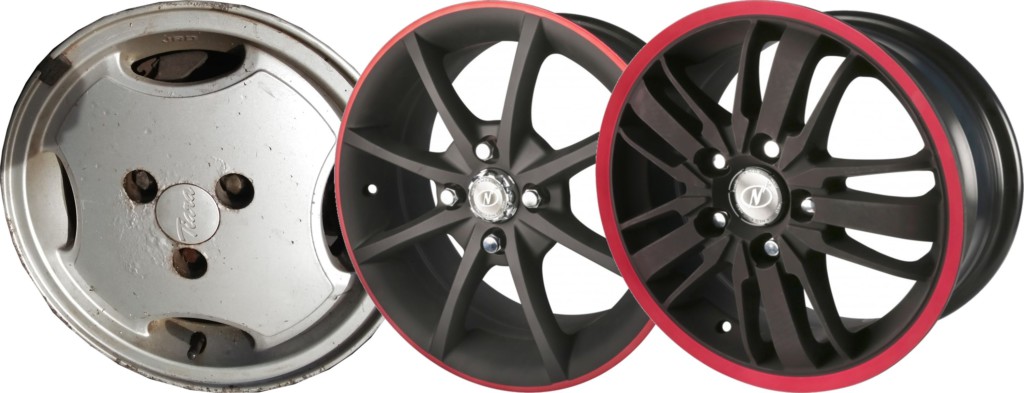
 In one of the previous posts of this series, I had the example of a wheel with different numbers of lug nuts, which could be avoided using a specialized tool that can attach various lug nuts in the same time.
In my next post we will look at the average work durations for the different tasks, how to determine them, and how to combine them into workstation-sized bits. In the meantime, go out and organize your industry!
P.S. Many thanks to Mark Warren for his input.
Series Overview
- Mixed Model Sequencing – Introduction
- Mixed Model Sequencing – Just Make the Problem Go Away
- Mixed Model Sequencing – Adjust Capacity
- Mixed Model Sequencing – Basic Example Introduction
- Mixed Model Sequencing – Basic Example Workload and Buffering
- Mixed Model Sequencing – Basic Example Sequencing
- Mixed Model Sequencing – Complex Example Introduction
- Mixed Model Sequencing – Complex Example Data Basis
- Mixed Model Sequencing – Complex Example Sequencing 1
- Mixed Model Sequencing – Complex Example Sequencing 2
- Mixed Model Sequencing – Complex Example Verification
- Mixed Model Sequencing – Summary
Here is also the Sequencing Example Excel File for posts 7 to 11 with the complex example. Please note that this is not a tool, but merely some of my calculations for your information.
Thanks for sharing the post as it would be very timely and helpful with the assignment I would be working on in near future. Looking forward to the next post eagerly.